Showing posts with label hand quilting. Show all posts

Monday, 11 February 2019

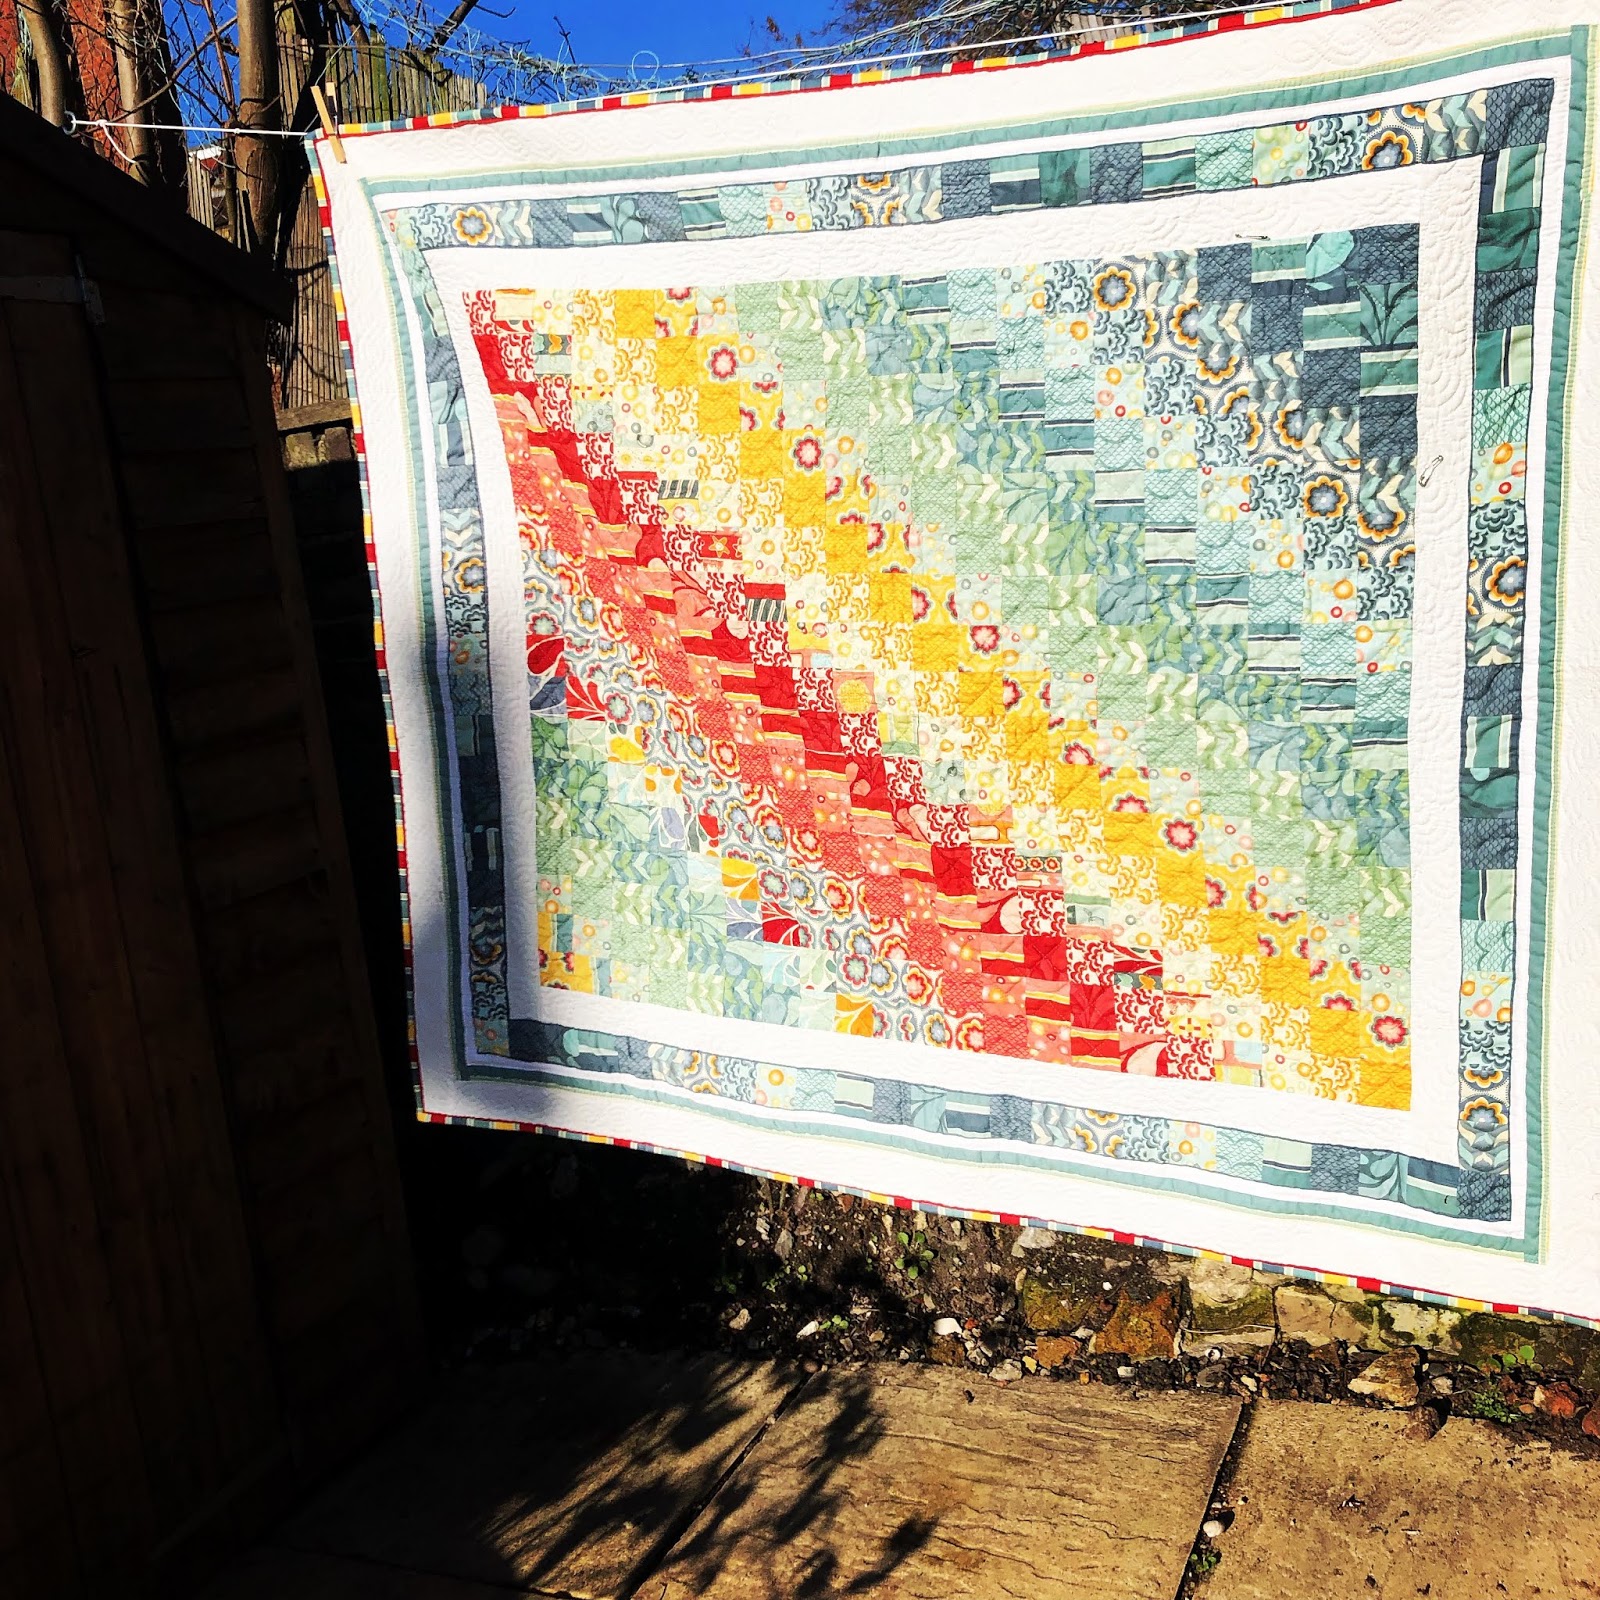
Finally Finished: Summer by the Sea

It's finally done and has only taken two years and 8 months to complete. I may have gotten slightly distracted by sewing and DIYing for the new flat in the interim.
Summer by the Sea in the January sunshine
This quilt should probably be called "Summers in Aeroplanes" instead as it's been on more trips than your average Gap Year Globe Trotter at this point. Off the top of my head the list includes Barcelona (Spain), Bordeaux (France), Dubai (UAE), Estonia, Germany, Italy, Paris (France), Riyadh (Saudi Arabia), Salzburg (Austria), San Francisco (USA), Zanzibar and, of course, a whole host of places in good old Blighty. Possibly my most cosmopolitan quilt yet.
Summer by the Sea
Hoping that it'll shrink more when I wash it
Summer by the sea
All of the squares in all of the rotations
(oooo! New quilt design idea!)


Started: May 2016
Finished: January 2019
Size: 108 x 126 cm (approx. 43 x 50")
Quilt top: 1 Jelly roll of Salt Air by Cosmo Cricket for Moda
Backing: Sea Garden in seafoam - Salt Air by Cosmo Cricket for Moda (I actually bought backing fabric this time. Shock. Horror)
Binding: StripeSalt Air by Cosmo Cricket for Moda 
Batting: Hobbs Heirloom Wool Batting
Quilting: 100% hand quilted using YLI hand quilting thread in white. Stencils from the Stencil Company 1.5" double cable and 1.5" shell border
Label: Scraps from quilt cutting as above


Summer by the Sea
Nautical quilting: Squares, shells, and a double cable
I've massively improved my hand quilting over the course of this quilt. My technique is probably completely unorthodox and 8 stitches per inch isn't really anything to write home about but I'm really pleased that much my speed and consistency has improved so much. I've tried out at least 5 different thimble / fingertip saving options in the process and finally found two that I really like.

Thimble Option 1: Metal fingertip shield
This fantastic fingertip shield from Colonial. You just stick it to your fingertip with the little sticky disks that come in the packet. Genius, but not great if you're quilting while travelling. I lost at least three of these but kept buying replacements because they are so good. A big thank you to my lovely friend Becca of BeccaSews who took me to the Great British Sewing Bee event at the Excel in London last year. I would never have come across these if I hadn't spotted them at one of the market stalls (Also you should check out Becca's jaw-dropping dress making skills. She bought stuff to make jeans and a jumper at this event and they turned out better than any I've ever bought in a shop! I'll just stick to my sewing-squares-together-and-hoping-they-match-up approach to sewing.)
Metal finger shield
Great at saving my fingertips!
Thimble Option 2: Silicone needle-puller
This silicone needle-puller comes a close second the above, depsite my hatred of all things pink (and especially this particular shade of pink). I found this even more effective for those tough bits where one is trying to quilt through a bazillion layers and seriously contemplating pulling the needle through with one's teeth. I found using these together with the finger shield above the best option.
Silicone needle puller
Stops me using my teeth on the tough bits
(naughty naughty!)

I'm also particularly pleased with this quilt's label, probably due to my love of boats of all kinds. While I've decided that this quilt is definitely on the "finally finished" pile, I'm seriously considering doing just a tiny bit more embroidery on the label because every boat needs a name!
Summer by the Sea
Sounds like a good name for a boat, no?
I have loads of this absolutely gorgeous fabric left and am already scheming for a bigger and more intricate quilt but in the meantime I'm enjoying snuggling up with this in my armchair while I toast my toes in front of the fireplace.
This is my monitor-lizarding-in-the-sunshine armchair,
not my toasting-toes-in-front-of-the-fireplace armchair,
but it'll do

Happy Quilting,
me x

P.S. Linking up to Finished or not Friday (because while today isn't Friday, I did finish this on a Friday), and Main Crush Monday (because I love this fabric so much that I'm already planning the next quilt for it)

Friday, 23 March 2018

Finally Finished! Summer By the Sea Borders

I finished the final border for Salt Air Summer by the Sea (new and improved name!) back in January! Yay! The double cable border has been really fun to quilt and my hand quilting has become so much more consistent over the course of this quilt. I'm so glad that this one is going to be mine to keep.


Summer by the Sea - finished borders! Yay!

As I have come to realise, however, the blue marking pens that I was using have proceeded to wear off rather badly over time. I suppose it's my own fault for taking so long to finish quilting the damn thing. I finally gave in the other week and spent an hour going through boxes until I found the stencil. I am so looking forward to having a place for all of my things once the builders finish my new cabinets. It will be so good to know exactly where everything is and not have to go hunting in 5 different places anymore (I suspect this might be slightly utopian, but one can hope, right?)


Summer by the Sea - double cable & shell borders


I spent ages agonising over how to quilt these borders and I'm so glad that I still like them after spending so long stitching them up! As you can see in the photo above, there are a couple of places where the threads aren't quite tight enough as it took me a while to figure out how to properly secure them but I'm fixing those as I go through.


Summer by the Sea - double borders (back)

Next up: finishing the diagonal quilting on the body of the quilt (oh yeah, that's still not done. Blegh). But then: Binding (!) and quilt labels(!!)

Really need to get back on this one but have been distracted by other projects, both sewing- and non-sewing related. More on my new curtains soon!

Hand quilting love,
xoxo me

P.S. Linking up to Finish it up Friday and Finished or not Friday (because it's kind of finished, and kind of not)

Friday, 13 May 2016

Finally finished: Tiny's quilt(s)


So, remember how I was working on this quilt for a special little lady who was due to arrive on May 23rd? Well, she decided that she couldn't wait any longer and came 3 weeks early!

I saw her briefly in hospital but am going over for a proper visit this coming Sunday. Her quilt isn't quite finished (if you remember, it got a little out of hand), but I've made her a proper baby quilt instead, which I finally finished last night.

Finally finished: Tiny's baby quilt
Miserable weather - need to get a photo in better light

Started: May 2016
Finished: May 2016
Size: 110 x 110 cm (approx. 42 x 42")
Quilt top: Patty Sloniger Les Amis in coral, white sashing from RayStitch in Islington
Backing: Old duvet cover from my grandmother's house
Binding:
Patty Sloniger "Les Amis" Star Pods in coral with scrappy top section made from off-cuts of all Les Amis coral fabrics
Batting: Cotton
Quilting: Machine quilted in offset squares (YLI machine quilting thread 40/3 in white), with randomly placed, hand-quilted hearts (YLI glazed cotton hand quilting thread in white)

Label: Sublime stitching "Kurt Halsey / Best Friends" embroidery pattern


The design couldn't really get much simpler - one big piece of fabric with some sashing. It's possibly the fastest quilt I've ever made; I managed to cut, piece, baste, and quilt it in a single afternoon (because what are you going to do while your sister is in labour - sit at home and quilt for your new niece, that's what!)

I hand-stitched the binding on the train on my way to see the little lady in hospital and then decided to spend a little more time making her a pretty quilt label. I'm really pleased with how this turned out (and really hoping her black hair isn't replaced by, say, blonde like her Mummy's, when it falls out)

Sublime stitching quilt label
I embroidered straight onto the finished quilt, which was a massive faff! I really struggled to bury my knots in the quilt sandwich and was really worried that it would all come undone. I've washed it twice now though and everything seems to be fine. The markings have almost all come out as well - a couple more washes and some baby vomit ought to do the trick.

I then decided that it was a bit too boring and decided to hand quilt some random hearts into the squares. There are about 12 of them in total.

Hand quilting: getting more consistent

My hand quilting is getting better - I can comfortably load 6 or 7 stitches and they're becoming more consistent in length. Now if only the back were as pretty as the front is.

Finally, here's a photo of the scrappy binding I made - it's actually the coral star pods fabric from the same fabric line as the quilt top on three sides of the quilt. The fourth edge has an insert of these scrappy offcuts I ended up with from the original quilt. While I really like this style (I trialled it on the Charity Auction baby quilt), I think it'll look better if I make my binding a bit wider. I think I'll try 3" or 3.5" double fold binding next time. What do you think?

Scrappy binding insert <3


Quilting love,

me x


Thursday, 19 November 2015

WIP Wednesday: Hexagon Quilt November 2015

I'm afraid I don't have much progress to report on the hexagon quilt front :(

You may remember this one...
from a month or two ago

My stitching on the tube plans were scuppered by the fact that I suddenly found myself on a project that allowed me to walk to work (not that I'm complaining about that in the slightest). However, now that I've found myself in Geneva for two months (very exciting!) I've managed to do a bit. Actually, I didn't bring sufficient supplies and have now run out of hexagons to sew together. Luckily, I will be flying back to the UK for the 1st weekend of December so I can stock up then.

Running low.
Nothing I can really do this these at present.

Speaking of stocking up, I seem to have run out of the white fabric I was using. I'm now obsessing about matching said fabric exactly, which will probably not be possible as I have no idea where it came from in the first place. My obsession with irrellevant details is really not helping. I've also decided that I need to match the background blue on this fabric ("Painted Mums" from Heather Bailey's discontinued "Fresh Cut" range), which is going to be tricky to say the least. Any advice?

Love, me xx

P.S. I'm linking up to Work in Progress Wednesdays over at Freshly Pieced.

Saturday, 19 September 2015

WIP: Hexagon Quilt September 2015

I've recently taken to working on my hexagon quilt on the tube in the mornings. It's only a 10 minute journey and I only have a seat about 50% of the time but I've been making some (very slow) progress!

Hexagon quilt: tube ride WIP

On my recent trip to St. Petersburg I finally managed to decide on the overarching design and the quilting. I also want to do some fancy quilting in the white triangles that the design creates and have been playing around with the idea of using my initials in an art deco style font but I might do some sort of geometric design instead.

Hexagon quilt: design sketches

I'm planning on making a king sized quilt so the dimensions of the sketch aren't right but you get the idea. I laid everything out on my queen sized quilt today to see what it looks like in real life:

Hexagon quilt: design layout

Progress so far:
Individual flowers: 2 green, 12 pink
Sections: lots of bits sewn together - the longest continuous bit current has about 8 flowers
Total flowers:37
Loose basted hexagons: 24 white, 115 print

Hexagon quilt: 14 flowers waiting to be connected

I'm going to need a lot more white hexagons! I'm not sure whether to be lazy (and applique the flowers on to a white background) or crazy (and piece the white sections from individual hexagons). Being generally crazy, I'm leaning towards option 2. What do you think?

I'm flying to Germany for a wedding next week so hopefully I'll get a few more done on the aeroplane.

Love,
Me x 

P.S. This week I'm linking up to with Jessica's Monday Morning Star Count. There are some gorgeous projects going on over there - you should check them out some time!
Check out WIP Wednesday over at Freshly Pieced as well. Seeing what everyone else is working on really motivates me to do more sewing - even if it's just some hexagons on the tube.

Sunday, 23 August 2015

Oh, YLI hand quilting thread, how do I love thee?


Oh, YLI hand quilting thread, how do I love thee? Let me count the ways. (I also love Elizabeth Barrett Browning)

This is why YLI hand quilting thread is awesome.

1. It comes on these handsome wooden spools.
Which are so much more awesome than the plastic ones.

YLI hand quilting thread - white

2. The colours are glorious!
I want to buy them ALL!!!! Also, Christmas is coming up in the not so distant future. Just saying.

YLI handquilting thread
green, spring green, yellow, peach


3. 100% glazed cotton.
I prefer natural fibres for (almost) everything in my life. Poo poo polyester.

YLI hand quilting thread
100% glazed cotton


4. Good value for money.
At 367 m (400 yards) per spool for £4.50 or $4.95 or €6.50 I can shop around the exchange rates to get a pretty good deal (oh, the joys of being a cosmopolitan quilter).

5. Pretty tangle resistant.
There's this German saying: "Langes Faedchen, faules Maedchen" which translates to "long thread, lazy miss" - I'm definitely lazy and would much prefer to work with a longer piece of thread and avoid tedious sewing up of the end as much as I can. There, I said it. AND I sometimes knot my threads at the end, even when I'm embroidering.


6. Just the right thickness.
Currently, I quite like the look of a slightly thicker, firmer thread in my hand quilting. I've used YLI's silk thread for projects that require a more delicate line in the past. While the colours are beautiful it is a bit fussier to work with. The 100% cotton thread is just the right thickness and firmness in my opinion. Also, I can cut it with my teeth and get a nice, clean end (ssshhh- don't tell my mother!) which, given the amount of time I spend scissorless on aeroplanes, is important.

7. Colours! All of the colours!
Did I mention the colours? Sooooo pretty!! I want them all so I can arrange them in battle formation to my heart's content. I am obsessed with rainbow order. I call it rainbow order just to annoy my physicist boyfriend (The Boy), who likes to insist that it's called wavelength order. Rainbow order makes me happy. 

YLI hand quilting thread
brown, ecru, cream, white

I've recently started quilting with YLI's 100% cotton machine quilting thread and it, too, is excellent. Not a single instance of broken or tangled thread yet and I swear it produces a less lint in my machine than other threads I've tried.

Then of course there is YLI's gorgeous silk thread. I've got two beautiful new colours just waiting for me to try them out. The colours are so intense and shiny that the photo below just doesn't do them justice.

YLI silk thread - sky blue, leaf green
 

I've just ordered some more of the ecru machine quilting thread for my current project - fingers crossed that it arrives in time for the bank holiday weekend; I have grand plans to finally finish my Hidden Stars quilt.

Love, me xoxo

Wednesday, 5 March 2014

Quilted Cushions for Christmas

I love alliterations. I also love how these cushions for The Boy's sister, D, turned out. I made the cushions to match the ZigZag quilt that I meant to give her for her birthday but which didn't get done until Christmas. 

D's presents: ZigZag Quilt with matching cushions


Cushion 1: Pop Art Cushion

Pop Art Cushion
Finished size: 30 x 30 cm

D loves pop art, especially Roy Lichtenstein. I ordered a screen printed sample panel on ebay. The original plan was a folded log cabin in black and white to frame the image but I forgot to take into account that the folds wouldn't stay folded when the cushion was inserted. So, in the end, I hand quilted the edges of the white frames. Both the black and the white fabrics were 100% cotton from my stash. My mum helped a LOT with this one, mainly because we were at my grandparents' house and had to use a very retro sewing machine that I was pretty incapable of sewing with. To be honest, she did all of the sewing for this one because I couldn't get the machine to behave at all. It's her old one from a long long time ago so she knows all its tricks.

Cushion 2: ZigZag cushion

ZigZag Cushion
Finished size: 50 x 50 cm

The second cushion cover I made for D matches the design of the ZigZag quilt that I made her. I used some of the remaining Bella Solids from the charm pack that I used to make her quilt (Bella Solids in bleached white) and black quilter's cotton from my stash. I didn't have time to quilt the cushion cover but the half square triangles are quite small so it's not really necessary in my opinion. I backed the pieced panel with some spare white fabric and zigzag stitched around the edges.

ZigZag cushion: getting better at half square triangles!
Cushion back & closure
Both cushion envelopes are finished with Tula Pink's Salt Water Sea Debris in aqua to match D's ZigZag quilt. I enclosed the edge of the envelope with a double folded strip of white and sewed on some snaps to keep the cushions closed. I found these great duck feather cushion inserts at John Lewis. They were less pricey than I was expecting, too!

Zigzag stitching the inside edges
The next time I make cushion covers I want to try to enclose the inner seams. Those zigzag-seamed edges really don't agree with my OCDness. Everything must be neat and tidy and perfectly straight. Everything! Luckily I'm moving into a new flat very soon so I have an excuse to make all of the pretty cushions for myself.

Xx me.

Saturday, 1 March 2014

WIP: Hexagon Quilt February 2014

I've been on holiday for the past two weeks and, annoyingly, was rather ill for some of it. This did, however, in combination with rather a lot of time spent in aeroplanes, give me a fair bit of time to spend on the hexagon quilt.

Here is February's progress report:

Progress: February 2014
Flowers: 6 pink flowers, 1 partial pink flower
Sections: two sections of 3 pink flowers each
Loose basted hexagons: 7 white, 41 print

Very pleased with myself, especially given that I'm currently still in the US and have a 6 hour flight back to London tomorrow and a trip to Germany coming up next week. Yay for sewing on the plane!

Love,
Me x


Monday, 13 January 2014

First post - first quilt

I've decided to start a blog predominantly as a record of my sewing/quilting/embroidery shenanigans. Maybe people will read it. Maybe they won't. It's the 21st century version of what my mother calls her "Quilting Brag Book". Hopefully it will mean that from now on I won't spend hours and hours on a project for someone, give it to them, and then realise that I've completely forgotten to take any decent photographs of it.

So, here's to ALL of the (mostly undocumented) pretty projects I've made so far and to all of those to come. Now all I have to do is learn to take decent photographs.

I've been embroidering and hand sewing since I was a little girl but only recently took up quilting. I am very lucky because my mother is The Quilt Queen (not the actual Quilting Queen of blogosphere fame, it's just my nickname for her when she rescues my latest project) and always seems to be able to fix my latest quilt nightmare. Unfortunately, she lives in another country so this usually results in half of my luggage allowance being taken up by some doomed sewing project or another.

I digress. Here's the very first quilt I made:

Samuel's Sunbonnet Sue & Sam Quilt

Samuel's Sunbonnet Sue and Sam Months of the Year Quilt
Started: January 2009 
Finished: June 2010
Size: no idea but somewhere around 60" long, given that I'm 5'6" tall.
Quilt top: Blocks hand pieced and needle-turn appliqued. Sashing and borders machine pieced by my mother.
Backing: Ralph Lauren Los Cabos
Binding: Ralph Lauren Los Cabos
Batting: no idea, possibly 80/20 poly/cotton blend. Whatever it was that my mother hand on hand at the time.
Quilting: Machine quilted in the ditch along sashing. Blocks hand quilted to enhance design.

Quilt back and label (WIP)


So, I started making this quilt when my friend O told me she was pregnant back in 2008 (!). I've always loved Sunbonnet Sue quilts so this seemed like the perfect excuse to make a months of the year unisex quilt. Unfortunately, little Samuel was born WELL before this quilt was even approaching finished. When I finally got it to them in July 2010, by which time I had already moved to the UK, Samuel was crawling. Erhem. Whoops.

Here are some photos of the individual blocks. Unfortunately, I don't have pictures of all of them, which is, in retrospect, rather sad.

January:
My mother had to help me add a border to this one because it was much smaller than the other blocks. This is the first block that I made for the quilt. In the final version I quilted it to give it more depth and a horizon. Apart from the background fabric this block is made entirely from scraps.

January: Frosty the Snowman

February:
No detail photo, which is a pity because this is one of my favourite blocks. Apart from the snowy sky background, everything in this block is made from scraps.

March:
Again, this block was much smaller than the others so my mother helped me add a border to it. Little Samuel's mummy is Irish so there had to be a St. Patrick's Day block! My favourite thing about this block is the little net ruffle on Sue's bonnet.
March: St. Patrick's Day

April: April showers....
This block was changed quite a bit before the end- I added some rain clouds (stuffed with scrap batting to make them three dimensional and interestingly textured), a puddle, and the words "April showers...." I bought a far eighth of wood print fabric for the tree and bright yellow for Sue's raincoat. This one really reminds me of the yellow Macintosh I had for my American Girl doll when I was little.

April: April showers... bring May flowers

May: ... bring May flowers
This is the first pieced block that I made and I was instantly hooked. Apart from the green background fabric and Sue's polka dot dress everything is made from scraps, mainly men's shirts.
May: April flowers... bring May showers

June:
No detail photos unfortunately. By this time I really wanted this quilt to be finished before little Samuel could walk so the last block, June, shows Sam & Sue swimming in the lake and is quilted with ripples.

July: 
Again, no detail photos to be found at the moment. I might go trawl my flickr stream and old computer back up CDs and see if I can find some. Anyway, this block has the quintessential American little red waggon. I actually bought fabrics for this block because I wanted the background to look dry and summery.

August:
Sam and Sue go to the beach! This is the first block that I embellished and my ice cream cone and shovel turned out a little small, didn't they? By the time I realised this though there were such big holes in the fabric from the embroidery floss that I couldn't really rip it out and start again.

August: Sue and Sam at the beach


September:
Picking apples. I originally had a gorgeous block of Sue flying a kite for this one but then I found out that O was having a boy and thought I needed more Sams and fewer Sues for this quilt. The apples are little red buttons and I found some cure squirrel buttons to add some more texture. I hand quilted the sky with swirling lines for wind.

October: Hallowe'en 
Sadly, no close up pictures again. I love the orange on brown print and really wish I'd bought more than a fat quarter!!

November: Guy Fawkes
Samuel's Daddy is British so the quilt needed a Guy Fawkes block. I used metallic thread for the fireworks and the sparklers. I HATE working with metallic embroidery thread because I can't seem to get the thread tension even and it's always tangling and pulling apart, usually at the same time.

December: Christmas
Lots of embroidery on this one. Unfortunately, the red DMC embroidery floss I was using for the wreath's bow bled a bit when I washed the block. Sad embroidery panda.

December

Homeless Blocks:
This quilt generated a couple of homeless blocks as my plans for it changed. Originally, each Sunbonnet Sue/Sam was meant to be appliqued on white backing but then I discovered pieced backing. Anyway, this block didn't really fit in because I love the "April showers... bring May flowers" thing too much so, if I remember correctly, I just appliqued it to the backing. Or maybe I turned it into a cushion. I honestly don't remember.  
May V1.0

My favourite thing:
My favourite thing about this quilt is probably that about 90% of the fabric is from scraps or from my own stash of fabrics, which was very small at the time. Luckily my mother let me paw through her scrap box. Making a quilt without spending a fortune on new fabrics is SO satisfying!
I also really enjoyed embellishing the blocks with ribbons, buttons, embroidery and bits of ruffle. I love things with interesting textures! Mainly though, I was just pleased as punch to have succeeded in finishing a quilt, albeit with a lot of help from my mother.

Onward and upward!
xx E